_1.png)


KS0261
Nuevo
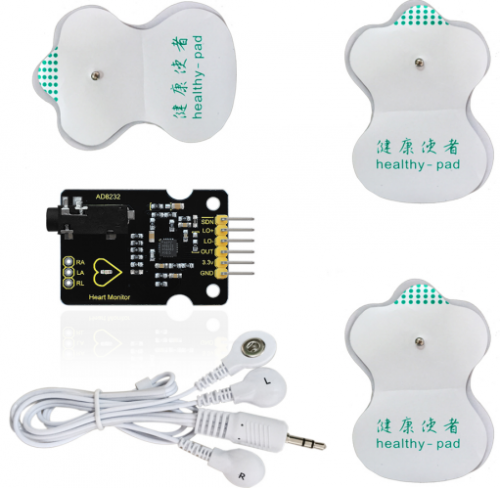
Conjunto del sensor AD8232 ECG de monitoreo del ritmo cardíaco. Marca Keyestudio.
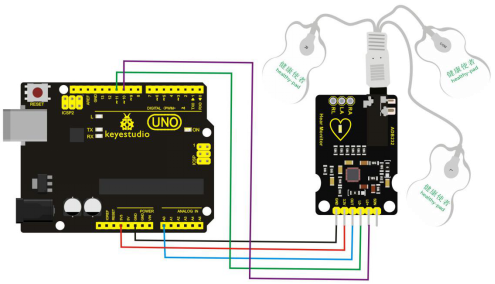
El módulo sensor AD8232 es un dispositivo integrado para la lectura y acondicionamiento de señales bioeléctricas cardíacas con el fin de suministrar información respecto al control y/o seguimiento de la frecuencia cardíaca. Este es un monitor frontal de bajo consumo, de un solo conductor y de frecuencia cardíaca para todos los tipos de signos vitales.
Las almohadillas de contacto con la piel son ideales para tomar lecturas de diferentes lugares del cuerpo, lo cual permite realizar una lectura mucho más confiable y profesional. Este kit de lectura de ritmo cardíaco en sencillo de instalar y usted puede encontrar ejemplos de programación en nuestra página web.

 CÓDIGO DE EJEMPLO:
1>grabar el código en la placa UNO usando Arduino IDE
void setup() {
  // initialize the serial communication:
  Serial.begin(9600);
  pinMode(10, INPUT); // Setup for leads off detection LO +
  pinMode(11, INPUT); // Setup for leads off detection LO -

}

void loop() {

  if((digitalRead(10) == 1)||(digitalRead(11) == 1)){
    Serial.println('!');
  }
  else{
    // send the value of analog input 0:
      Serial.println(analogRead(A0));
  }
  //Wait for a bit to keep serial data from saturating
  delay(1);
}
2>use el software de procesamiento para encontrar el programa de la siguiente manera:
myPort = new Serial(this, Serial.list()[2], 9600);
This program,Serial.list()[2],9600,is to check the serial port of the computer you used,for
example,the below figure shows only one port, so it is Serial.list()[0],9600.

<br>[[File:KS0261-4.png|500px|frameless|thumb]]<br>

When the computer appears COM1 and COM5,COM5 is the UNO test of AD8232 board, so it shows Serial.list()[1],9600, you can refer to the below figure:

<br>[[File:KS0261-5.png|500px|frameless|thumb]]<br>
<pre>

/****************************************************************************
Heart_Rate_Display.ino
Demo Program for AD8232 Heart Rate sensor.
Casey Kuhns @ SparkFun Electronics
6/27/2014
https://github.com/sparkfun/AD8232_Heart_Rate_Monitor

The AD8232 Heart Rate sensor is a low cost EKG/ECG sensor.  This example shows
how to create an ECG with real time display.  The display is using Processing.
This sketch is based heavily on the Graphing Tutorial provided in the Arduino
IDE. http://www.arduino.cc/en/Tutorial/Graph

Resources:
This program requires a Processing sketch to view the data in real time.

Development environment specifics:
	IDE: Arduino 1.0.5
	Hardware Platform: Arduino Pro 3.3V/8MHz
	AD8232 Heart Monitor Version: 1.0

This code is beerware. If you see me (or any other SparkFun employee) at the
local pub, and you've found our code helpful, please buy us a round!

Distributed as-is; no warranty is given.
****************************************************************************/

import processing.serial.*;

Serial myPort;        // The serial port
int xPos = 1;         // horizontal position of the graph
float height_old = 0;
float height_new = 0;
float inByte = 0;


void setup () {
  // set the window size:
  size(1000, 400);

  // List all the available serial ports
  println(Serial.list());
  // Open whatever port is the one you're using.
myPort = new Serial(this, Serial.list()[2], 9600);
  // don't generate a serialEvent() unless you get a newline character:
  myPort.bufferUntil('\n');
  // set inital background:
  background(0xff);
}

void draw () {
  // everything happens in the serialEvent()
}


void serialEvent (Serial myPort) {
  // get the ASCII string:
  String inString = myPort.readStringUntil('\n');

  if (inString != null) {
    // trim off any whitespace:
    inString = trim(inString);

    // If leads off detection is true notify with blue line
    if (inString.equals("!")) {
      stroke(0, 0, 0xff); //Set stroke to blue ( R, G, B)
      inByte = 512;  // middle of the ADC range (Flat Line)
    }
    // If the data is good let it through
    else {
      stroke(0xff, 0, 0); //Set stroke to red ( R, G, B)
      inByte = float(inString);
     }

     //Map and draw the line for new data point
     inByte = map(inByte, 0, 1023, 0, height);
     height_new = height - inByte;
     line(xPos - 1, height_old, xPos, height_new);
     height_old = height_new;

      // at the edge of the screen, go back to the beginning:
      if (xPos >= width) {
        xPos = 0;
        background(0xff);
      }
      else {
        // increment the horizontal position:
        xPos++;
      }
  }
}
Using the software to open the program,click  key. Using three pads,R-end is stuck on the left chest, L-end is for the right chest, COM is stuck near the stomach. It will appear the following pattern, and the LED light on the PCB board will flash with the heartbeat. In this way,you can make sure that the board is available.
Módulo sensor de gas (MQ-5) para ARDUINO. Marca Keyestudio.
YHDC SCT013 30A SCT-013-000 Sensor de corriente alterna no invasivo Transformador de corriente de núcleo dividido
CJMCU-83 AEDR- 8300 encoder reflective 2 channel optical encoder Encoders
Módulo sensor de detección de corriente para ARDUINO. Marca Keyestudio.
Módulo copa de luz mágica para ARDUINO. Marca Keyestudio.

Conjunto del sensor AD8232 ECG de monitoreo del ritmo cardíaco. Marca Keyestudio.